OpenMinder™: Getting Started
What you will need
- 1 x Raspberry Pi 2 or 3 and SD Card with Raspbian installed
- 1 x OpenMinder™ Hat
- 2 x pH probes - any probe with a BNC connector should work but we recommend:
- 2 x Autogrow Intelligent EC Probes - the ones used by the IntelliDose - with red/black/white connection
- 2 x tipping buckets - we recommend the Pronamic Rain-O-Matic 100.053 but cheap rain gauges can be found on AliExpress
Connect the OpenMinder Hat to your Raspberry Pi
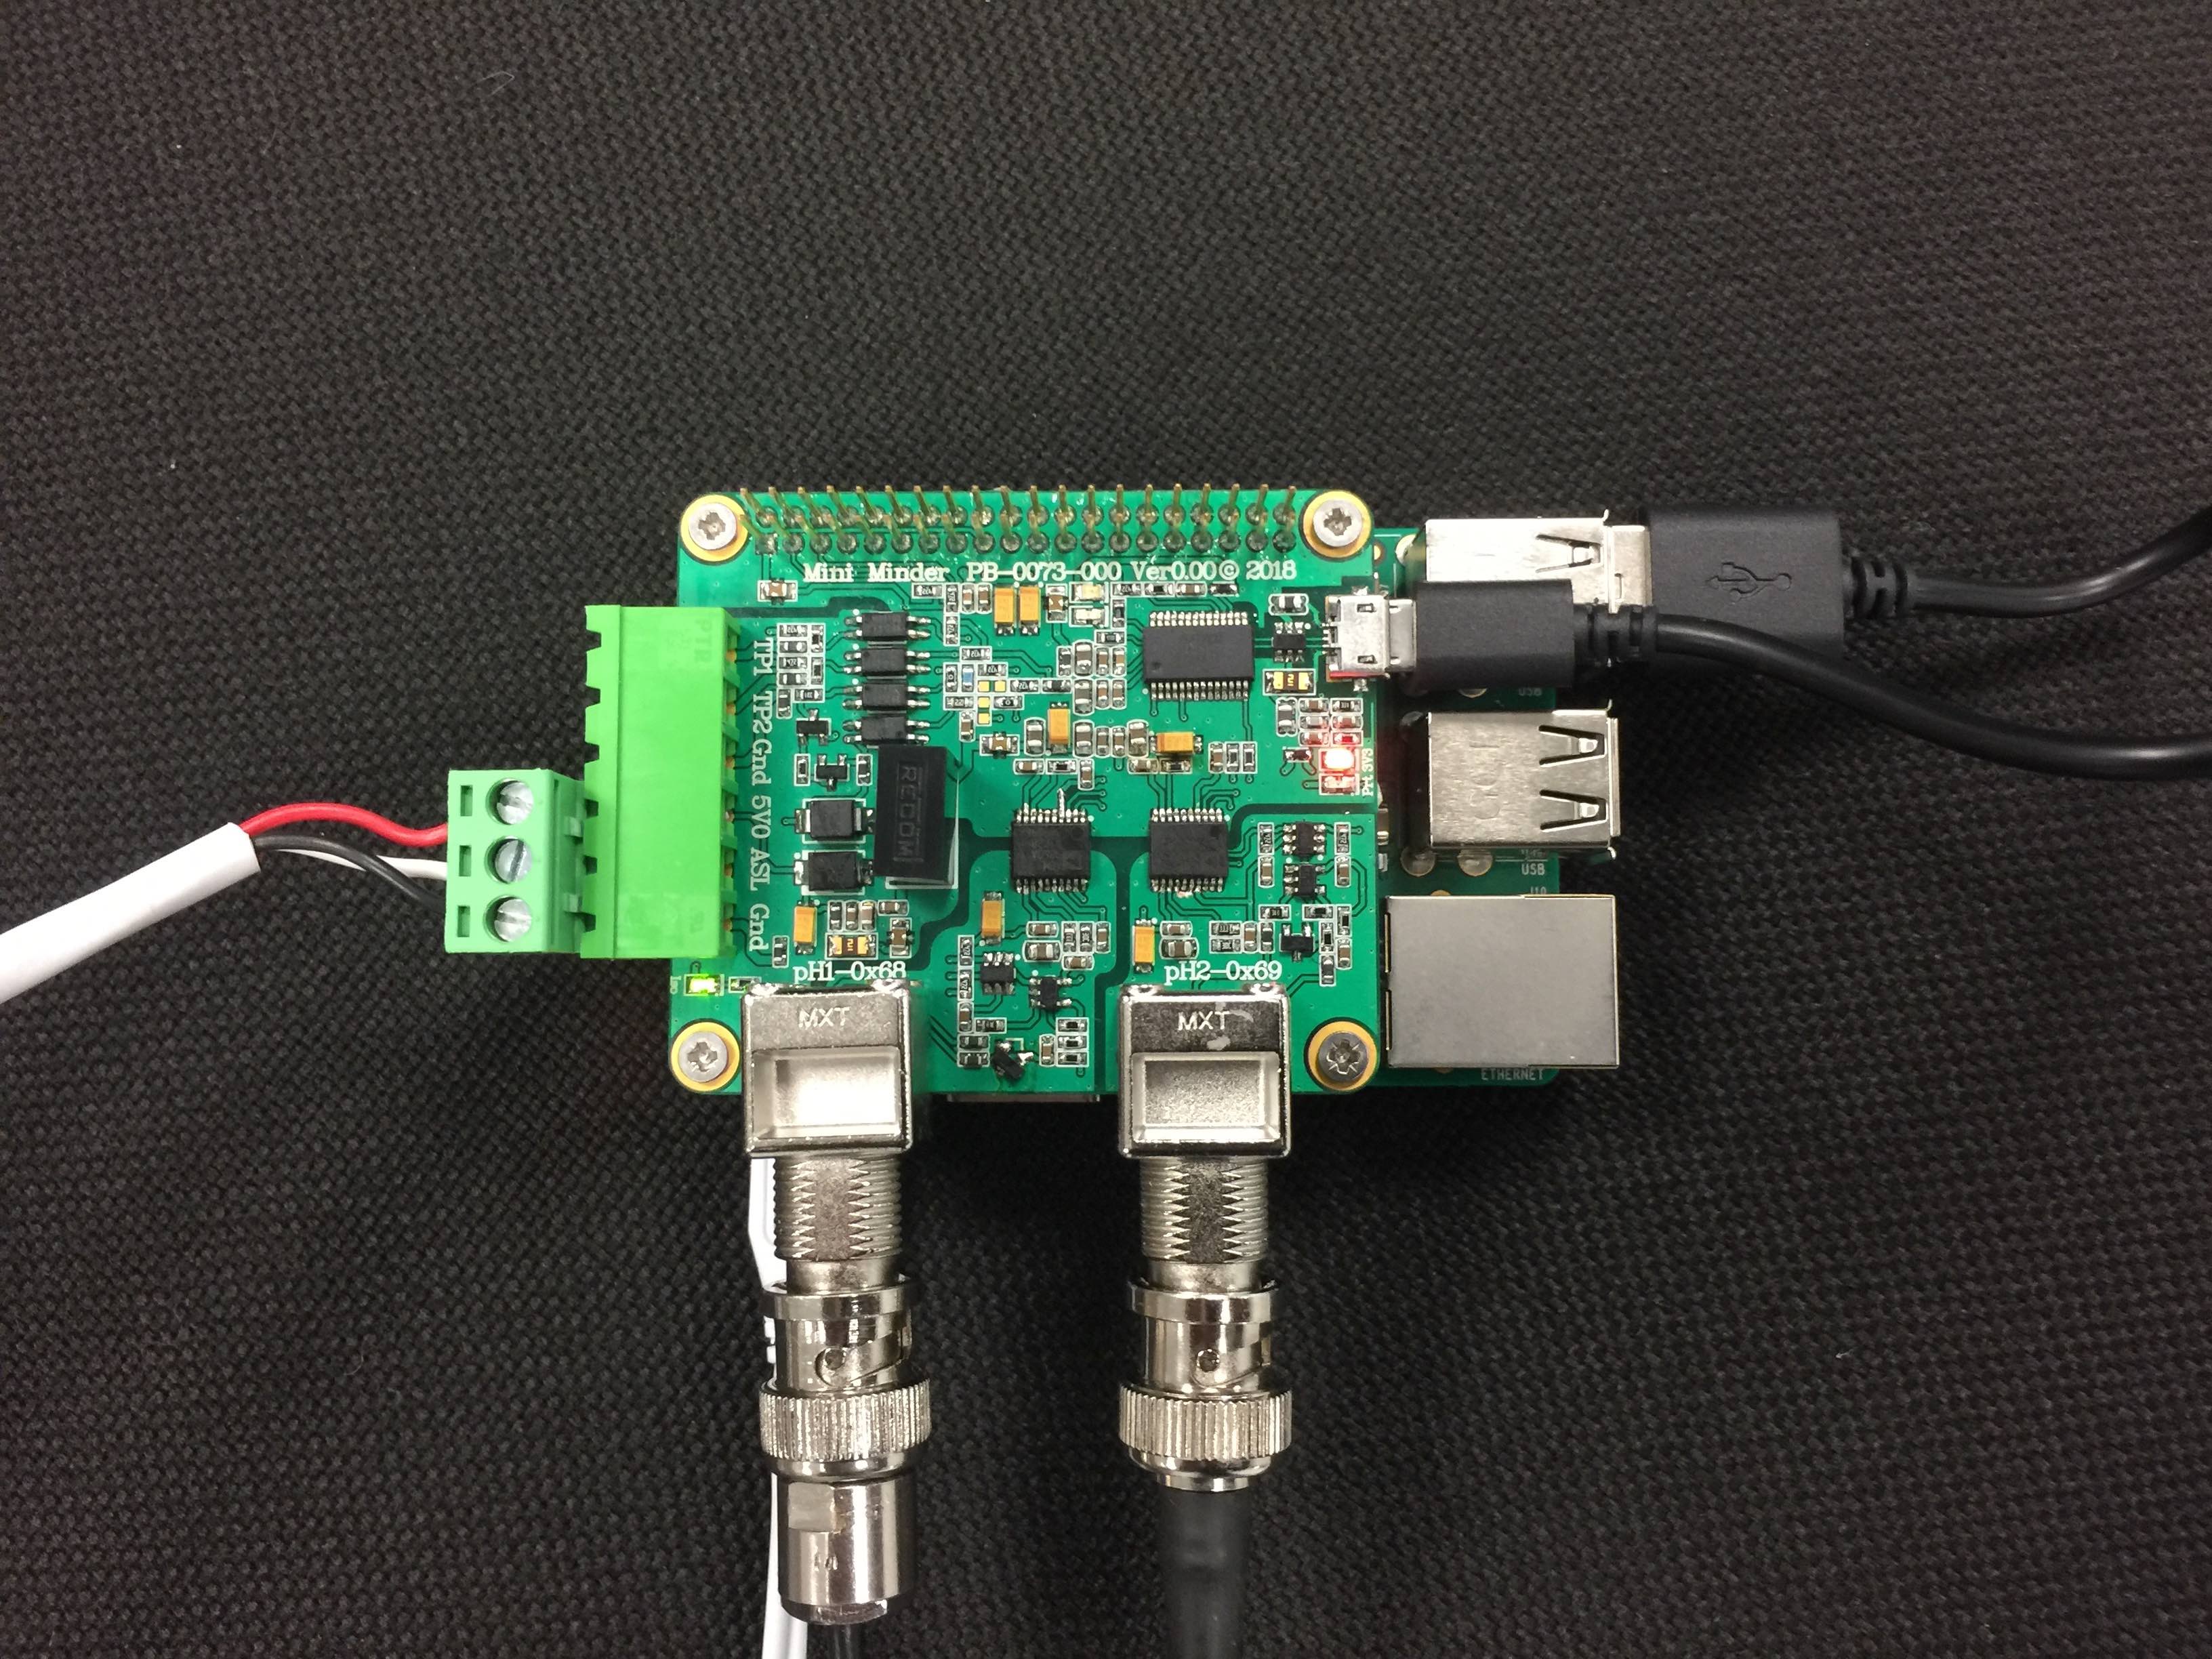
Plug the hat onto the Raspberry Pi 2 or 3 as below, with the circuit board overlaying the Raspberry Pi. The hat will draw it's power from the Raspberry Pi. Tests show this combination does not consume more that 500mA.

The connections should be wired up in the following manner:
BNCs
| BNC | Description |
|---|---|
| 0x68 | Irrigation pH Probe |
| 0x69 | Runoff pH Probe |
6 way connector
| Pin | Description |
|---|---|
| TP1 | Irrigation Tipping Bucket |
| TP2 | Runoff Tipping Bucket |
| GND | Tipping bucket common |
| 5V0 | Both EC probes red wires |
| ASL | Both EC probes white wires |
| GND | Both EC probes black wires |
EC Probes
The EC probes talk over a formerly-proprietary protocol called ASLBUS which runs over a serial bus. For this reason, the same coloured wires from each probe should be connected together before being wired into their respective pins.
Tipping buckets
It doesn't matter which way the tippings buckets are wired up as they are simply a switch as long as one wire from each shares the GND connection.
Install the OpenMinder™ service
You can install the binary itself from the releases page on Github, or from the Autogrow Debian repository:
curl -s https://packagecloud.io/install/repositories/autogrow/public/script.deb.sh | sudo bash
apt-get install openminder
Installing the Debian package allows the binary to be managed by a SystemD service, however if you install just the binary you can get the service file from Github repo.
Edit the config file
A config file (in json format) must be provided to the service at runtime. It has the following fields:
| Field | Default | Description |
|---|---|---|
| irrig_tb_gpio | GPIO5 | The GPIO to use for the irrigation side tipping bucket |
| runoff_tb_gpio | GPIO6 | The GPIO to use for the runoff side tipping bucket |
| port | 3232 | The HTTP port to serve the API on |
| scan_timeout | 60 | The max time to scan the bus for EC probes |
| irrig_ec_probe | The serial number of the irrigation side EC probe | |
| runoff_ec_probe | The serial number of the runoff side EC probe | |
| tty | /dev/ttyUSB0 | The TTY that the EC Probes are connected to |
| drippers_per_plant | 0 | The amount of drippers in each plant |
| runoff_drippers | 0 | The amount of drippers feeding into the runoff tipping bucket |
| irrig_drippers | 0 | The amount of drippers feeding into the irrigation tipping bucket |
The TTY and GPIO fields should be left as the defaults as that is determined by the hardware on the OpenMinder hat.
Drippers
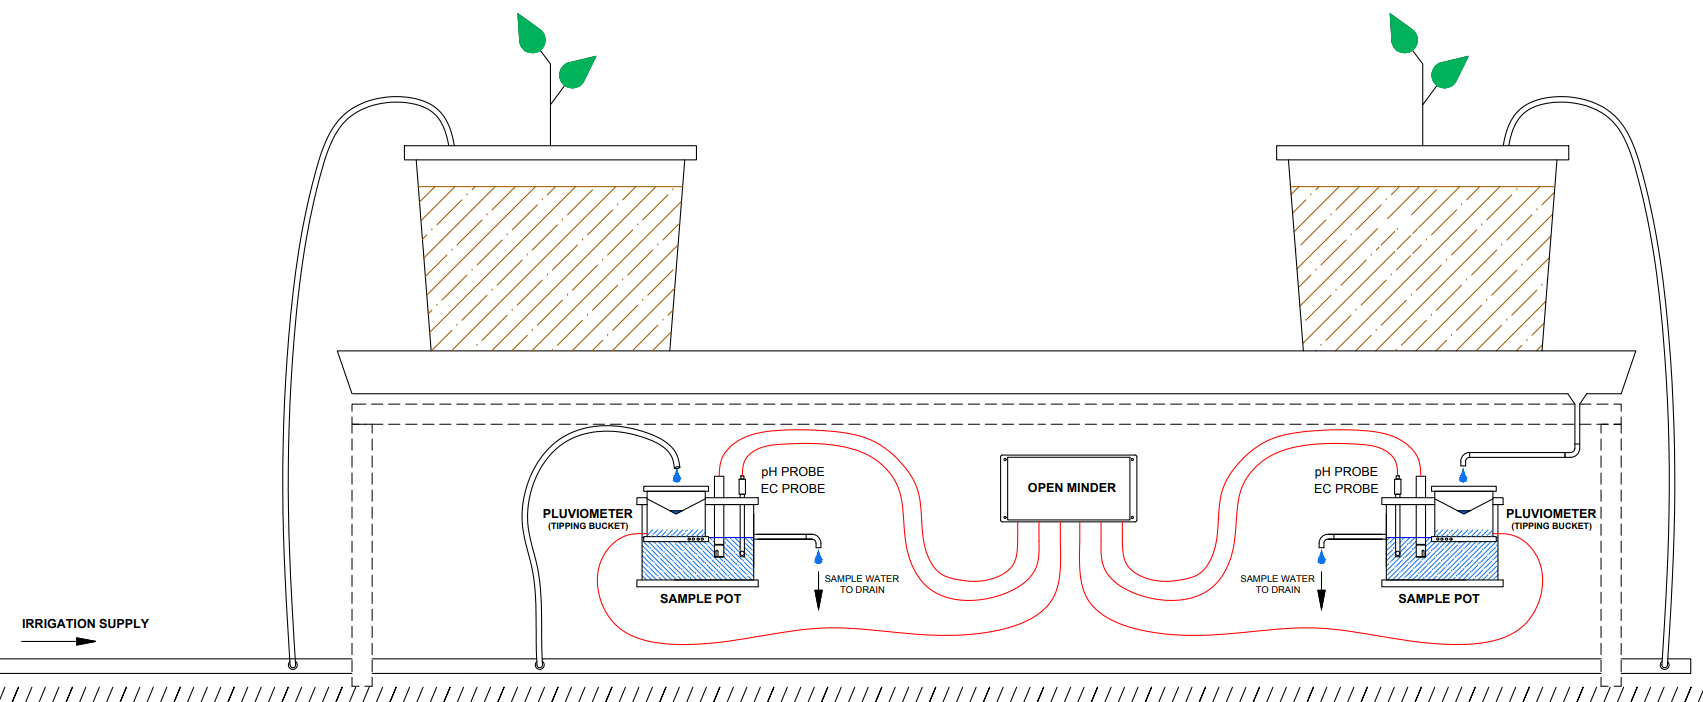
The drippers values aren't required, but will help to calculate the correct runoff ratio, otherwise it will simply be calculated by the runoff and irrigation volumes. Using this diagram as a reference:

You can see that each plant has a single dripper, so there are 2 drippers feeding into the runoff and a single feeding the irrigation tipping bucket. As the runoff is getting twice as much water as the irrigation we can account for this in the runoff ratio calculation with the following config:
"drippers_per_plant": 1,
"runoff_drippers":    2,
"irrig_drippers":     1
EC Probe serials
If the service is started with nothing in the fields then a scan of the bus is automatically initiated to find any connected
EC probes. If any are found the config file will be modified to include them. Thus, next time the service starts it won't
need to do a scan. If the irrigation probe is actually in the runoff side, you can modifiy the file manually and switch them
or call the API with PUT /v1/bus/swap and they will changed both in the running service and the file.
Run the binary
You can run the binary directly:
./openminder -c config.json
Or by using the service with:
systemctl start openminder # expects a config file at /etc/openminder.json
You can then access the API served by the binary at port 3232:
curl http://localhost:3232/v1/readings
This will give back the current readings in JSON format:
{
    "irrig_adc": 0,
    "irrig_ph_raw": 0,
    "irrig_ph": 0,
    "runoff_adc": 0,
    "runoff_ph_raw": 0,
    "runoff_ph": 0,
    "irrig_tips": 1,
    "irrig_volume": 0,
    "runoff_tips": 1,
    "runoff_volume": 0,
    "irrig_ec": 0,
    "irrig_ec_raw": 0,
    "irrig_ectemp": 0,
    "runoff_ec": 0,
    "runoff_ec_raw": 0,
    "runoff_ectemp": 0,
    "runoff_ratio": 0
}
Calibrate your probes and tipping buckets
By default the readings from the EC and pH probes may not be totally accurate, and the tipping buckets will report tips and not volume. To remedy this, we need to calibrate these readings.
There is a specific API endpoint that allows any readings to calibrated:
PUT /v1/calibrations/:field/:scale/:offset
Tipping buckets
So you can make each tip of the irrigation tipping bucket represent 5 mLs with the following call:
PUT /v1/readings/calibrate/irrig_volume/5.0/0.0
Or alternatively you can use the omcli tool to do the same:
omcli -calib -set irrig_volume,5.0,0.0
After this the irrig_volume reading will be populated with the next tip.
Probes
Calibrating the probes is a little more complicated so it's recommended to use the omcli tool to
help you through each step of the process.
Lets start with calibrating the EC value. Unless you specify using -buffer 5.0, the EC buffer will
be set as 2.77mS/cm2 by default, the most commonly used EC buffer. You also need to specify which sides
probe you are calibrating, irrigation (-irrig) or runoff (-runoff). It will start a small wizard
on the command line which will do the calibration and push it to the API.
$ omcli -calib -ec -irrig
wash the probe and put it in the 2.77 buffer solution, then push enter...
waiting for the readings to settle... 30 # wait for the countdown
taking reading...
reading was 2.81 EC
calibrated probe, scale=0.99 offset=0.00 - save this? [Y/n]: y
saved
The pH has two steps, you must first take a reading from a pH7 buffer solution, and a second from a pH4 buffer solution. Only then can the calibration be calculated.
$ omcli -calib -ph -runoff
wash the probe and put it in the pH7 buffer solution, then push enter...
waiting for the readings to settle... 30 # wait for the countdown
taking reading...
reading was 7.12 pH
wash the probe and put it in the pH4 buffer solution, then push enter...
waiting for the readings to settle... 30 # wait for the countdown
taking reading...
reading was 3.98 pH
calibrating...
calibrated probe, scale=0.60 offset=-0.12 - save this? [Y/n]: y
saved
